Powered By Blogger

Sunday 30 August 2015

Whole School Art Project

Hi Claire,

I have been following your blog online over the summer and it has been a great source of inspiration with lovely hints and tips and I have really enjoyed reading it. I am currently undertaking the PME (Primary Education) and I am going into my second year and final semester of the course. In January I have an extended school placement which will involve a Special Focus strand where I will have to collaborate and implement a long term plan for the 10 weeks in a particular area. I have an interest in Visual Art and would love this to be my special interest focus but I have to implement a plan that will involve a whole school approach and I am just struggling to come up with an idea that will be suitable for all class levels and allow everyone to get involved. I am also a little worried about undertaking a project like this with regards to classroom management, and involving all class levels. If you had advice or tips they would be greatly appreciated as I am back in my old primary school and would like things to go as well as possible!

Any information you could provide would be greatly appreciated.

Thanks,

Kind Regards,
Katie
________________________________________________________________

Hey Katie, Awh thanks so much for the lovely message! :) Well done on being so near the end of the course, you must be excited to finish it.

I once co-ordinated a whole school project, there was a theme and each teacher was asked to add a certain area to the board. They put their own spin on it and it turned out to be a fantastic project.

This is probably different as you may be expected to do it all for your course. 

The first thing I would do is think of a theme. This could be something based on the school's ethos, or maybe the time of the year?

You said that you are worried about involving the whole school- but I would see this as a positive. The senior years can help the younger years. They love this responsibility- and you'll be amazed at the children that shine in these activities, often children who are quiet or weak in other subjects. It's such a confidence boost to be able to help a younger child.

Maybe teach a skill to the older classes and let them show the younger ages how to do it? If you're doing it whole school it's always nice to do it in a team building way.

Have a chat with the teachers in the school, there might be some that love art and they will know the school and the children. They may be able to give you tips and ideas too.

I'll stick this up on the blog and maybe other teachers/artists with experience in this may be able to help too.

Best of luck with it!
Claire :) x x

Websites for Art

Create Jackson Pollock style paintings
http://www.jacksonpollock.org/

Picasso Style Portraits: 
http://www.picassohead.com/

Creating Snowflakes:
http://www.zefrank.com/snowflake/

Graffiti Creator:
http://graffiticreator.net/


Pointillism Art, you will need Shockwave for this:
http://www.incredibleart.org/links/pointillator.html

http://mathtoybox.com/calligraphy/calligraphy.html#.VeLTtNNViko

So many online, comprehensive list here:
http://www.incredibleart.org/links/artgames.html

"Myself", Senior Classes

"Hey Claire.. You're doing a great job. I've sixth class I'm looking for new ideas to do with the theme myself. Any would be great something different. Thank you
"


A lot of points in my previous post are still relevant in senior classes:

http://clairesprimaryschoolart.blogspot.ie/2015/08/myself-is-great-theme-to-begin-school.html

Here are some more ideas that may be useful in the senior classes!


During my drawing skills classes, the children were given a long length of string to create the contours of their self- portrait. 


By standing a child up on a height- the other children can draw them from a lower perspective. We discussed how the head would look smaller than normal and the feet bigger because of the angle they were looking at the child from.


I love this idea- it integrates literacy and SPHE also. In the self portrait are all the things that make that person them! It's a nice alternative to a 'myself' poem.


Children may also finish the other half of their portrait from a photo. You could also print out a photo on paper, rule squares over it. Rule the same amount of squares on a bigger blank piece of paper and draw what they see in each square on the paper. 


Create silhouettes by drawing around their heads. Then fill the silhouettes with all the hobbies and characteristics that make them unique!


Pop Art- take a photo and print it out. Using carbon paper, trace over the photo. Then they can have fun making them into a pop art style. There is also great space here to teach them about Pop Art: http://www.ducksters.com/history/art/pop_art.php. 

Here's another Pop Art response to Self Portraits- looking at Andy Warhol:
http://thecraftyclassroom.com/crafts/famous-artist-crafts-for-kids/andy-warhol-art-project-for-kids/

I really liked this idea also- 
http://www.startsateight.com/2011/10/chuck-close-portraits/


A self-portrait in mosaic.


I thought this was a fun idea!

We responded to Picasso using coloured paper with the older children.


Saturday 29 August 2015

What is in your art supplies kit?

In my school we get our art supplies at the beginning of each year. This includes A4, A3 and A2 paper, lollipop sticks, glue, paint, felt, tissue, crepe paper, paper plates and clay. We also have a small allowance to buy some extras if we need to.

If you are starting teaching practice- check what the teacher has in the classroom before you go out and buy. Keep in mind that it has to last the full year though, so be mindful of the amount you use also!

In other schools that I worked in, some teachers buy all their own equipment.

This is what I like to have:

A class set of scissors- left and right.

Drawing- 
A selection of light and dark pencils
Charcoal
Ink
Markers
A variety of paper- including newsprint, wallpaper and spare bits of backing paper

Paint & Colour-
Thin and thick paint brushes- cheaper is fine for younger years. I'd imagine the seniors would need a better quality and a few fine paint brushes to allow them to create higher standards of work.
Oil Pastels
Chalk Pastels
Paints- Yellow always runs out on me! :)
Acrylic paint is handy for printing, and dries quicker than printing oils
Marbling inks

Fabric and Fibre-
Materials box- about 6 years ago I got loads of old material books from a local curtain shop. I have them all in a large plastic box and add bits and pieces now and them. The children love to literally dive into it!
Cotton wool comes in handy every year
Embroidery thread
Hessian
Plastic needles

Clay-
There are normally clay moulding tools in the schools central resource.
Slip is handy to have to stick clay together
Plastic tubes for rolling, I cut some plumbing piping up.

Print-
There are normally rollers in the class resource centre
Acetate or the plastic covers from old CVs
Trays

Construction-
Old egg cartons
Toilet/ kitchen paper rolls
Masking tape
Bottles
Cardboard- cereal boxes
Plaster of Paris strips are great to have for construction too

Inspiration-
SESE Books
National Geographic magazines
Storybooks
Magazines
Toy Catalogues

As the years go on, my classroom seems to get more and more cluttered...I blame art!! ;)

Confirmation Art Ideas

"Loving your blog. I'm wondering if you or your followers have any nice Confirmation Art Ideas. M"

Okay, first of all this is well out of my comfort zone at the minute! It is also another one of those art lessons that need a product, and it's not really letting children be creative as the teacher has the pressure of making the church look presentable- but needs must!


When I decorated the church for confirmation, I used the dove and chalices. In each chalice, there was a piece of communion, with the children's photograph on each. I created another display of flames, decorated by rolling crepe paper into balls and sticking down.

I currently work in a multi-denominational school, and with younger years. But here are some ideas I found online:


This is a handy one to avoid templates, but still have an effective product. I like the second one that displays the gifts the Holy Spirit brings. 


This is another way to create a dove. They have scriptures depicted in the background- but I think the 7 gifts could also be here- on a card disk at the back.
A 'butterfly' clip will hold it in place to spin around, available in most stationary shops.


I really like both of these ideas- just change it up a bit to suit the sacrament of confirmation. The strips of a picture above actually show the story of creation, but again, I think the seven gifts could be shown here. 


How about a big dove and a child's name in each star? Change up the Peace message with something more appropriate to the sacrament. 

Here are some group projects:

Each child decorates a lollypop stick and they are placed to create a cross.


The children create their own crosses (templates proved below). 


On a piece of wood, or other material, the children write their favourite quote from the Bible, these are arranged into a cross.


I've covered this idea before- it's great for a group project and will be a long lasting resource. Hamer in tacks in the shape of a cross. Each child adds their own piece of wool to create an effect cross.


This is etched on foil. I love this.  Place the foil on a soft surface (some felt) and using a pencil, draw on the back. It will be a raised design on the front.

The foil can be hung on a display as it- or maybe joined together as a group project. Using a staple gun, it can be attached to wood.

It is more expensive than your regular art lesson, but it's a special one. The A4 sheets could be cut in half with a scissors to lower costs.

Buy here: http://corkartsupplies.com/Copper-Foil-18.5x29cm-3pk-C03979 


Marbling using colours of the flames is also very effective. See how to marble on my older post, here: http://clairesprimaryschoolart.blogspot.ie/2015/08/marbling.html 


Stained glass crosses. I think the handiest way to do this is to arrange the cross and tissue paper inside a laminating pouch. Laminate and all will be protected and in place. Maybe others approach this a different way?


Some templates that may be handy to have:


Dove Template:
http://theideaking.blogspot.ie/2013/12/diy-paper-dove.html

A Selection of Cross Templates:
http://www.all-about-stencils.com/cross-stencil.html

This website has many ideas for teaching religion lessons as well as creating some art based on the lessons:

http://flamecreativekids.blogspot.ie/search/label/Holy%20Spirit


Thursday 27 August 2015

GAA Art for Infants in September

"Hiya Claire, sorry I hope you don't mind me mailing you like this. First of all thanks so much for such a super blog! I'm not the most artistic or creative so a page like this is very inspiring :) I was just wondering if you could help me out with something...might even make an interesting blog post! Basically my school is near the Galway/Mayo border so we have two big GAA matches coming up. Im just wondering if there's anything you could recommend to do using this theme with junior and senior infants that's nice and easy as this will be their first art lesson."


Here are some ideas I've just thought of from the top of my head. Other people may be able to add some more. I've tried to keep in mind that you want straight forward, easy lessons. The first week back is busy and infants need time to learn all routines, let alone the art one!

Hopefully these are easy to implement, but effective pieces to celebrate the GAA!


Flags:


The first easy lesson on this would be simply making the flags. There a lot of skill involved here for infants- you could discuss what 'half' is- great for maths integration. Even folding the page in half would be very tricky. 

Colouring them in with oil pastels will look more vibrant than crayons, and less messy than paint (for the first lesson).

You could always stick lollipop sticks on the back to make it more of a flag.

Sam Maguire Cup:


Many children will know the cup- especially from these counties! While templates aren't always recommended, they are practical- especially when you need a product, and there are other processes you can experiment using them.

A simple template of the cup could be decorated using the mosaic technique. The children rip paper into small pieces and stick on the trophy to make their own Sam Maguire. Ripping paper is great for fine motor and a good beginning point before cutting techniques are introduced to junior infants.

You could integrate materials in science and discuss the materials they might find that would look best. I've never used tin foil with infants, if that was too tricky to use maybe some silver paper would be best.

Hats:


Cut out the middle of a paper plate- leave a small bit attached (about 10cm). The round edge will go around the child's head and the middle can stand up. They can decorate this in their team colours.

These ones have been cut into shapes, but you could leave them round also. 

They could paint before they are cut out. If you get a craft blade it will be much quicker for you to zip around and cut them out. 


Jerseys:


My nephew was in 3rd Class last year and loved this:


Using a jersey template, the children coloured the jersey in their favourite team colour. The senior infants may even be able to add some of the logos etc. 

Maybe they could get creative and design a new jersey? 

Handprints:


Handprints are a popular infant art lesson- they grow so quick! 
Why not do them in their team colours? 

I hope this is of some help! :) 


Wednesday 26 August 2015

Responding to Music with Art

Music is the subject I fear! I'm a total visual learner, some people contest this, but I have to see things to remember them! The CD player is my best friend at music time! :D

I do like to respond to music though. I find chill out sounds to be an invaluable resource in the classroom. We meditate to them and I often play music during art.

Playing a good variety of music is best to get the children to respond to it.

Start with something dark and slow...


And then maybe contrast it with something fast and vibrant!


And ask one or some of these questions:
Draw a pattern in response to the music
Draw a line to show the shape of the music
Draw a picture of what you think about when you listen to this music
Draw a picture to tell what is happening in the music
Draw a picture about what the music reminds you of
Draw a series of cartoons to go with the music
Draw the instruments you hear
Design a CD cover for this music
Draw a picture of the part of the world that this music comes from
Design a poster to advertise a performance of this music
Design a stage setting for this music
Draw a portrait of the composer
Draw a design to show the different sounds you hear

And embrace the abstract creations that happen!! 


An Artist to Explore "Construction" with.

Alexander Calder was an American artist that created the mobile. His structures are very similar to mobiles hung above babies' cots. Many children in your class will relate to this. It might even be a great topic to cover if there's a new baby in the house!

Some of Alexander Calder's work.

Here are some responses to his work:


Calder's work is made of many shapes.  These could be explored in a "Drawing" lesson.


A soft, jewellery-like wire can be used to create sculptures. This is easy to manipulate and can be cut with wire cutters or a sharp scissors.


Both these activities could lead to the creation of a Calder inspired mobile. Wrap crepe paper or tissue around the wire to make the colourful shapes.


I also really like these creations! 
They remind me of the resources you might find in ReCreate Ireland. This is based in Ballymount in Dublin. They stock odds and ends from companies. If your school is registered, you can visit and fill up the car with all the resources. 


http://recreate.ie/

"ReCreate is a national social enterprise that takes end of line and surplus stock from businesses and reuses them as arts materials. Our warehouse is full to the brim with all types of fantastic arts materials such as paper, wool, plastics, fabric, tubing, foam and many other unusual and unexpected surprises."

Tuesday 25 August 2015

"Winter"

Drawing


I came across this idea on Pinterest, it's a great example to begin shading and where light hits an object. 
You could develop this by drawing still life with light reflecting on one side- a bright winter's morning, or a safer bet in Ireland- a lamp!

Paint &Colour

Wax resist


Wax resist is such a handy lesson. I recommend using cheap, waxy crayons. Candles work really well too. Mix the paint with lots of water to ensure the wax resist is obvious.

Tones of Blue

Create tones of blue with white and black paint mixed with the blue.


This is another example of a painting found online, it's a brilliant extension to the tones of blue lesson.

Painting on Ice

http://www.education.com/activity/article/paint-with-ice/

This lesson is always referenced on early education/ preschool pages- but it's a great discovery learning lesson for primary school age also. A child in my first class tried to bring a snowball in to school in his pocket "for later"- this ended up being a great lesson in ice and melting!

There are two ways to approach this:
1. Freeze a mixture of paint and water in ice cube trays. Allow the children to paint with.
2. Freeze a larger volume of water (in a butter tub) and allow the children to paint on it. 

Splat Painting

A snowy background can be created in Jackson Pollock style! See previous posts for examples of how to explore;

http://clairesprimaryschoolart.blogspot.ie/2015/08/primary-colours.htmlChalk Drawings- dip the chalk in paint for some creative exploration!

http://clairesprimaryschoolart.blogspot.ie/2015/08/story-books-to-teach-children-about.htmlPrint
Snowmen

Negative space picture

I love the creativity in this!


Mix glue and shaving foam. It will dry as a 3-D foam. Very effective!

Clay

Penguins and snowmen are easily created from clay. Ensure to use scour and add a drop of water when sticking the snowmen together/adding beaks and noses!

Fabric & Fibre

Polar Bears are easily created from cotton wool. Tin foil works really well as a reflective background.


I came across this fantastic snowman online- and an eco friendly lesson too ;) 


Construction

Penguins and Snowmen


Another take on this is to stick the cotton wool on the outside to create fluffy snowmen.

Why not give the bottles and black and orange paper to the children and see what they create?! 


Snowflakes


Fold and cut paper to create individual snowflakes.

Explore the true story of Wilson 'Snowflake' Bently, a photographer of snowflakes.


An easier method of constructing a snowflake for younger years.


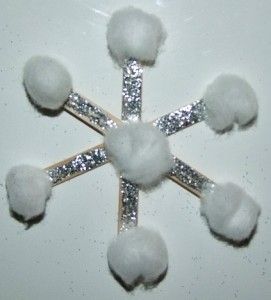
Snowflakes with lollipop sticks.

Snow Globes


https://www.pinterest.com/pin/506725395544563063/


Print

Using natural resources to print snowflakes


Experiment with different textures to create print effects. 

Winter books to respond to:

"Penguin"


"The Snowman"